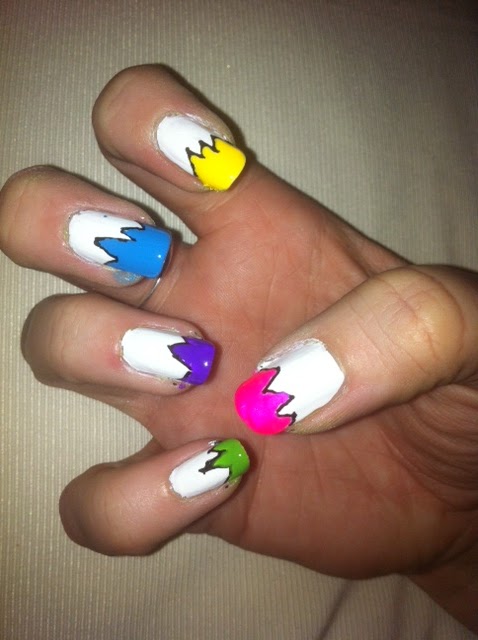
This jagged tips manicure was posted back in November by The Princess of Polish. As soon as I saw it I immediately wanted to try it (another reason I took the green/polka dots mani off without wearing it out). It reminds me of a comic book and I love the bright colors contrasting with the white base and the black zig zags. I did those zigs zags freehand with a nail art pen - need more practice at that. But I still love this manicure... behold the jagged tips. Love it!!!
At the end of this post, I'd just like to take a moment to complain about how little the workers at my local beauty stores know about the world of nail polish. They never know when stuff is coming out and it seriously annoys me!
Sunday, February 5, 2012
Dot Explosion
Here is another manicure that never left the house. Although the pizza delivery chick did compliment me on it this afternoon when I had a pizza delivered. LOL This polka dot manicure was originally intended to be a recreation of another tutorial, but halfway through it became clear that it was going to be too difficult for me, so it became something totally different. I'm going to try the original one again sometime though. I didn't keep this on becuase I just wasn't happy with it. Too much going on and not all the dots are round, which annoys me.
Misc. Manis
I've been sick so I haven't blogged much and I left a couple manis on for 3 or 4 days each which I NEVER do... but I got pics of all my recent manicures so here they are.
First up... this is one of my new Red Angel stamping plates. I love this design!!
This next one was a fail. The first couple fingers looked good the others are a hot mess. I was trying to place individual glitters picked out of a glitter polish in a clear jelly. It looked a lot better in my head but here's how it turned out:
The next manicure was inspired by this post by Kayla Shevonne. I loved the colors she used, and I just recently bought some new Wet N Wild colors that were quite similar, so I took them out for a spin and I really liked them. Plus they were cheap - only $1.99 each at W@lgreen's. I got a lot of compliments on this manicure:
The following manicure was never worn outside my house because I wasn't ultimately happy with how it turned out. I was happy with the sponging, but the stamping was a total fail. I just need more practice. It just sucks because if you mess it up, you have to take it off which takes off the base polish, which you then have to reapply, and it just takes forever. But regardless, here it is:
Sunday, January 22, 2012
Tutorial Followed - Acid Leopard Nail Art
I saw the tutorial for this manicure earlier in the week when Colette first posted it and as soon as I watched it I knew I wanted to try it. Colette is one my biggest nail art inspirations. I've tried several of the water marble tutorials she has posted on Y0uTube but I haven't had much success making them look very good. But I love watching all her videos and I obsessively check her blog for updates every evening before I go to bed.
So Colette posted this tutorial on how to create "Acide Leopard" nails. I followed the tutorial to the letter aside from using more of a creamy, opaque white as the base rather than a sort of shimmery white like she used. I also picked up the same nail art pens as she used in her video. I must say it looked like she had a much easier time using it than I did. It was a catch 22 because I tried using the pen before I put my top coat on but after sponging the paint was not smooth and I couldn't draw a half circle for anything. So I put on a coat of seche vite which made the surface smoothe, but seemed too smooth for the polish in the nail art pen to soak in. I might add this was my first time ever trying leopard print free-hand so I'm happy with how it turned out. I think I will be better next time I use it.
So here is how it turned out on me:
So Colette posted this tutorial on how to create "Acide Leopard" nails. I followed the tutorial to the letter aside from using more of a creamy, opaque white as the base rather than a sort of shimmery white like she used. I also picked up the same nail art pens as she used in her video. I must say it looked like she had a much easier time using it than I did. It was a catch 22 because I tried using the pen before I put my top coat on but after sponging the paint was not smooth and I couldn't draw a half circle for anything. So I put on a coat of seche vite which made the surface smoothe, but seemed too smooth for the polish in the nail art pen to soak in. I might add this was my first time ever trying leopard print free-hand so I'm happy with how it turned out. I think I will be better next time I use it.
So here is how it turned out on me:
I am so geeked over this manicure!!! Thanks to Colette, for breaking this down into steps that are easy to follow. For my very first time sponging polish onto my nails, I am extremely happy with how this looks. And best of all, I think the world of sponging has been opened to me and I am having lots of ideas of how I can incorporate the technique into other designs.
I might throw some matte top coat on this tomorrow after work - I am curious to see what that will do to the look. But either way, I like this so much I think I will keep it for a few days. I want to show it off at dinner with some girlfriends on Tuesday night.
Purple Holo on Purple Jelly
Tic Tac #251
China Glaze - IDK
I can say with certainty that this is manicure is one of my favorites that I've ever done. That Tic Tac color is the one I bought at my local nail salon after my last pedicure. And I just think the holographic color really pops on top of that bright purple jelly.
Nicki Minaj Colors
OPI - Pink Friday (Nicki Minaj Collection)
OPI - A Grape Fit
OPI - Fly (Nick Minaj)
I was expecting Pink Friday to be a much brighter pink, but it's still a pretty shade. The glitter one is fun too but I'm really annoyed with glitter tips because they never seem to be smooth and I always end up scratching myself. I only kept this a day - I wasn't super thrilled with it.
Thursday, January 19, 2012
Black Monday
This past Monday was a sad day all across the frigid state of Wisconsin, our beloved Pack having lost in the first round of the playoffs. As I said in my last post, I had vowed to wear black on my nails the next day if they lost the game.
As it turned out, the Packer's loss also coincided with a happy event: the arrival of my first bottle of Magnetic Polish!! I first saw this online before Christmas but didn't actually buy it until last week. I ordered it from Amaz0n, and it was a splurge. It's called Trafalgar Square and it's by a company called Nails, Inc.
So basically, you paint your nails with one coat of this. Then, one nail at a time, you paint another coat, then hold the magnet that's embedded in the cap over the nail and it makes the following design:
I think this looks AWESOME! The first time I did it, it didn't turn out well, so I had to take it off and start over. Before I did that, I decided I didn't want to waste any of it, so I thought I'd use a dark color underneath for the first coat instead of a layer of the magnetic. I used a dark blue thinking it might look cool if it showed through a bit, but you can't really see the blue except by the cuticle where it looks crappy.
Anyway, I thought this was an appriately dark polish to wear on a day of mourning. Now that I've seen how this stuff works, I would really like to have some of the other colors. I know there is a purple and I might have to splurge on that one sometime in the near future. I also want to try using this effect with some other shapes and colors.
As it turned out, the Packer's loss also coincided with a happy event: the arrival of my first bottle of Magnetic Polish!! I first saw this online before Christmas but didn't actually buy it until last week. I ordered it from Amaz0n, and it was a splurge. It's called Trafalgar Square and it's by a company called Nails, Inc.
So basically, you paint your nails with one coat of this. Then, one nail at a time, you paint another coat, then hold the magnet that's embedded in the cap over the nail and it makes the following design:
I think this looks AWESOME! The first time I did it, it didn't turn out well, so I had to take it off and start over. Before I did that, I decided I didn't want to waste any of it, so I thought I'd use a dark color underneath for the first coat instead of a layer of the magnetic. I used a dark blue thinking it might look cool if it showed through a bit, but you can't really see the blue except by the cuticle where it looks crappy.
Anyway, I thought this was an appriately dark polish to wear on a day of mourning. Now that I've seen how this stuff works, I would really like to have some of the other colors. I know there is a purple and I might have to splurge on that one sometime in the near future. I also want to try using this effect with some other shapes and colors.
Subscribe to:
Posts (Atom)
